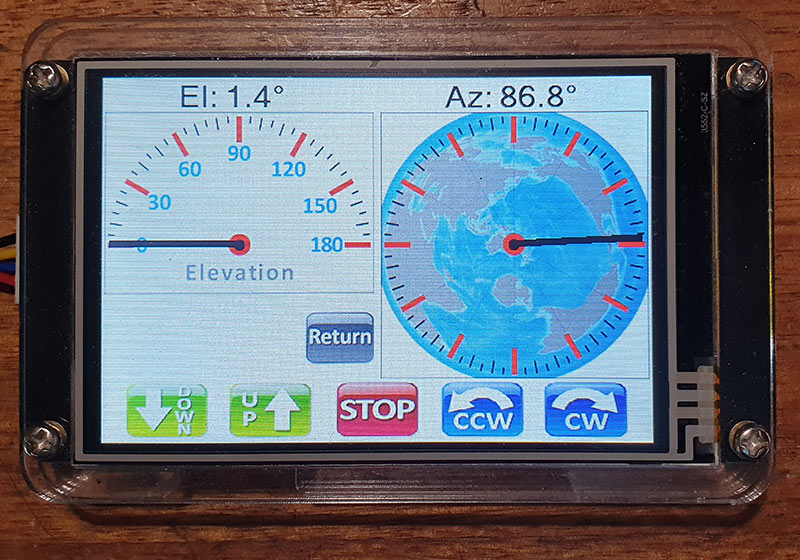
This update introduces a new page for a large Azimuth only gauge.
Two alternate Azimuth gauge backgrounds can accommodate both close-in terrestrial VHF/UHF work or world-wide HF operation.
Change log:
V2021-06-29

Note:
* This update will reset your existing Nextion settings stored in EEPROM
Make a note of any preset Az & name tags, UDF name tags, and config settings
before updating.


New:
• 3.2", 3.5", 5.0", 7.0" - BigAz page.
Large Azimuth only gauge for terrestrial (non elevation/tracking) work.
Touch middle of gauge for keypad entry.
Various buttons, icons and features depending on screen size.
3.2" has touch points every 30°
3.5" has touch points every 30°, two alternate gauge backgrounds.
5.0" has touch points every 15°, two alternate gauge backgrounds.
7.0" has touch points every 15°, two alternate gauge backgrounds.

Long touch middle of Az gauge to change to alternate gauge.
Preselect alternate 1 / 2 gauge background on config page.

• 3.5", 5.0" 7.0" Config1 page - New button to select BiG Az gauge as default
start up screen.


Fix:
• 3.5", 5.0", 7.0" Clock page - font preview incorrect when changing colours.
Video of latest changes and features
Adam discusses and demonstrates the latest changes.
Zip packages can be downloaded from the VK4GHZ K3NG Nextion Project page:
Switching to a custom azimuth background image is achieved with a long touch at the center of the Big Az Gauge.
This selection setting is remembered in Nextion EEPROM for next time, along with your other Nextion config settings.
A short touch in the center of the Big Az gauge still allows for direct Az bearing entry via the keypad.
How Do I Implement This?
You will need to generate your own image in your own preferred image editor, such as Photoshop.
(There are other free image editors out there, but aim for something more capable than Windows Paint!)
For small fiddly stuff, I usually create image masters at 2x or 3x final size and re-size when doing a ‘Save for Web’.
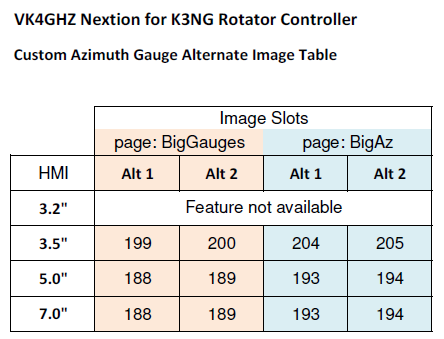
Example, from above table:
3.5″ Nextion, BigGauges page, alternate Az image 1 = image slot # 199
Refer to the Image Table documentation contained in zip package for image size information.

Save Nextion project, and upload project via your preferred method.
Either as .hmi file via a USB FTDI adapter or create a .tft file output and upload via microSD card.
Resources:
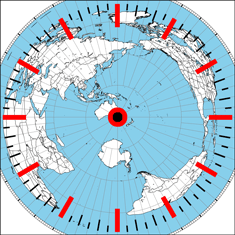
NS6T Azimuthal Map
The azimuthal map seen above was generated by the online utility by NS6T:
https://ns6t.net/azimuth/azimuth.html
Enter your grid locator, and you can experiment with your desired ‘look’.
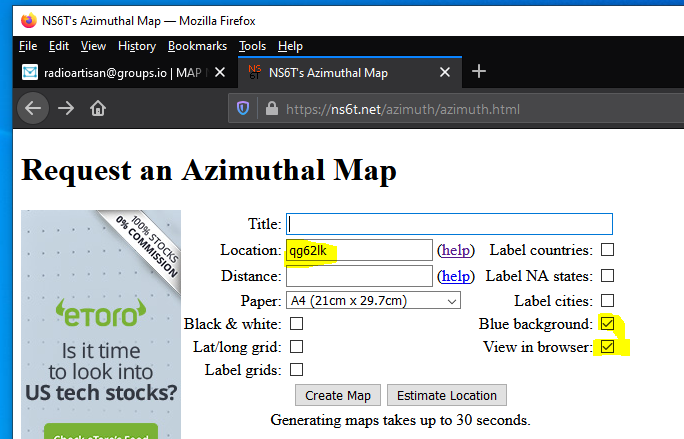
If View in browser is not ticked, a pdf will be generated.
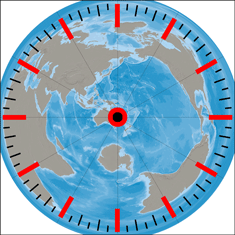
Great Circle Mapper
A Windows 10 application by EI8IC is available from:
https://www.mapability.com/ei8ic/gcm
Trial period last 30 days, then USD$10 registration.
This produces nice and ‘clean’ images.
Country outlines (with NS6T) are appropriate for large A3 hard copies, but IMO this clean look is preferred for small displays.
Irrespective of your chosen look, make a screen shot capture of the generated map and paste this into your image editor to ultimately create a PNG image.
GCMWIN
A Windows application by SM3GSJ is available from:
https://www.qsl.net/sm3gsj/gcm.htm
This is an older program (circa 2010) but still works fine with Windows 10.
Produces images like this:

Nextion Editor download:
https://nextion.tech/nextion-editor/
Photoshop .psd Master template use summary
The official Photoshop .psd file ‘Compass Rose.psd’ can be used as a template for those with Adobe Photoshop.
If you do not have Photoshop, other image editors are known to work with a .psd file, but you will need to research this.
Using this template will allow the easy creation of a custom image whilst matching existing gauge images.
Or, you can go nuts and change the look of all the gauges!
Be careful!
This Photoshop master is used for all Azimuth and Elevation gauge variants, and has many layers.
This Photoshop master is sized at 980 x 980px.
Copy & Paste your custom image into Photoshop and drag this new layer down to just above the existing Custom Az BG layer.
If you paste an image that is larger than 980 x 980 px you have some wiggle room and can size/manipulate the image layer to be nice and centered.
Bearing numbers were removed with a white paintbrush for a cleaner look.
Being a larger master size, Save For Web as a PNG and re-size down to the required size.
Refer to the Image Table documentation for your size Nextion to see which image slots you need to change and how big the images need to be.
Example: Alternate Az Gauge image for 3.5″ MainGauges page:

This 235 x 235 px image will be imported into Nextion Editor.
Open Nextion Editor , and replace picture slot #199 with your own custom image.
3.5″ Nextion using Great Circle Mapper (by EI8IC) to create the background image: